How to Assemble a Cabinet
Guide to Assembling Frameless Style 5/8″ Plywood Cabinets
This guide provides step-by-step instructions for assembling frameless cabinets made from 5/8″ plywood, utilizing screw and dowel joinery. You’ll also learn how to install drawer boxes with undermount soft-close slides and attach doors with concealed European soft-close hinges.
Tools and Materials Needed
Tools & Supplies
- Electric drill or screwdriver
- 5mm drill bit
- Phillips head screwdriver
- Measuring tape
- Level
- Square
- Wood glue (optional)
- Double Sided Tape
- Rubber mallet
- Utility knife
- Safety goggles
Materials
- Cabinet parts (sides, top, bottom, back, shelves)
- Screws (included)
- Dowels (included)
- Drawer boxes
- Undermount soft-close drawer slides
- Cabinet doors
- Drawer Fronts
- Concealed European hinges
- Cabinet hardware (handles, knobs)
Step 1: Prepare Your Workspace
Choose a large, flat surface to work on. Make sure you have good lighting.
Unpack the cabinet components and verify you have everything based on the parts list. Encore Cabinets packages all the cabinet box parts for each cabinet together for easy organization. Doors, Drawer Fronts, Drawer Boxes and Hardware are packaged separately for maximum protection.
Step 2: Assemble the Cabinet Box
Assemble Back Panel to Top and Bottom
- Locate the Dowels: Place the Thick Back panel on a work bench or the floor. Note that it will be inset ¼” so setting on some blocks might be helpful. If there are no divisions, partitions or fixed shelves in your cabinet locate the dowels on the top and bottom ends and skip to step 3.
- Divisions, Partitions and Fixed Shelves: (If Applicable)
- Locate the Dowels: On the end of your division, partition or fixed shelf there will be dowels. Apply wood glue to the dowels (optional). Align divisions, partitions and shelves with the back panel.
- Secure the Division, Partition, or Fixed Shelf: These can be secured with screws from the back of the back panel. This can also be done once the cabinet assembly is completed and the back is exposed.
- Align the top/bottom Panels: Apply wood glue to the dowels (optional). Align the top and bottom panels with the dowels.
- Secure the Panels: Ensure the panels are secure by fastening them together with screws.
Attach the Left Side Panel
- Locate the Dowels: Locate the dowels on the left side of the back, top and bottom panels. If your cabinet has fixed shelving, partitions or divisions they will also have dowels that will need to be aligned.
- Align the Left Side Panel: Apply wood glue to the dowels (optional). Align the left side panel with the dowels.
- Secure the Panels: Ensure the panels are secure by fastening them together using screws.
Insert the Intermediate Stretcher (If Applicable – Only Used for Cabinets with Drawers)
- Locate the Dowels: Insert the Intermediate Stretcher into the receiving dowel holes just below where the drawer slides will be on the base left side panel. Make sure the edge banding is facing out.
- Secure the Panels: Ensure the Stretcher is secure by fastening it together using screws.
Insert the Toe Kick (For Base Cabinets Only – For Wall Cabinets Skip to Attaching the Right Side Panel)
- Locate the Dowels: Locate the dowels on the left side of the Toe Kick.
- Align the Toe Kick: Apply wood glue to the dowels (optional). Align the dowels on the front Toe Kick with the receiving holes on the base left side panel just below the cabinet bottom.
Attach the Right Side Panel
- Locate the Dowels: Locate the dowels on the right side of the top, bottom and back panels as well as on any intermediate stretchers and toe kick (if applicable).
- Align the Right Side Panel: Apply wood glue to the dowels (optional). Align the right side panel with the dowels. The cabinet can be flipped onto the left side panel to make this easier.
- Secure the Panels: Ensure the panels are secure by fastening them together using screws.
Install Shelves (All of the remaining steps should be done after the cabinet is installed)
- Mark Shelf Heights: Use a measuring tape to mark the desired heights on the inside of the cabinet.
- Insert Shelf Pins: Insert shelf pins into the marked holes to support the shelves.
Step 3: Install Drawers and Doors
Install Drawer Hardware and Drawer Box
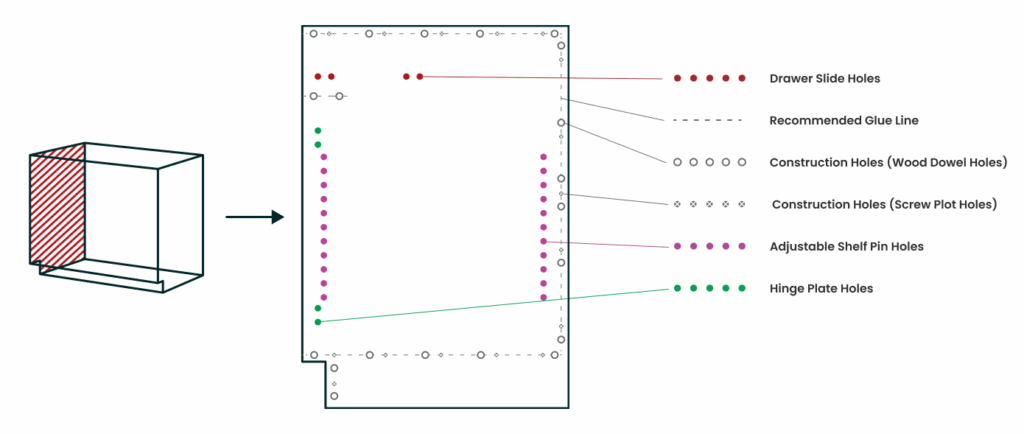
- Install Drawer Slides: Attach the slides to the cabinet sides using the top row of holes with the supplied Euro screws. Holes are predrilled for convenience. Make sure drawer slides are evenly installed on left and right side of cabinet and are level front to back. See Drawing 1.
- Rollouts that require spacers will use the bottom row of holes on the drawer slides to avoid conflict with the hinge plate.
- Drawer boxes use the fourth hole on the slide lined up with the first hole on the cabinet side.
- Rollouts use the second hole on the slide lined up with first hole one the cabinet side.
- Install the Locking Device: Screw the grey locking device onto the bottom, front corners of each drawer box.
- Install Drawer Box: Lift the drawer box and align it with the slides inside the cabinet. Push the drawer box in until it clicks into place.
Prepare the Doors
- Mark Hinge Placement: Identify the top and bottom of each door and where the hinges will be placed on the back. There will be holes pre-drilled in the back of each door for the hinges.
Install Concealed European Hinges
- Attach Hinges to the Door: Secure the hinges (also known as the hinge arm) in place with screws.
- Attach Hinge Plates to the Cabinet: Secure the hinge plates in place with supplied screws into predrilled holes. The hinge plate holes will be closer to the front of the cabinet than the adjustable shelf pin holes for easy identification. See Drawing 1. Ensure the plates are on the correct side to result in your desired door swing and are the correct height to line up with door hinges.
- Mount Hinges to the Cabinet: Position the hinge mounting post on the hinge arm against the front of the hinge mounting plate on the cabinet frame and push the back of the hinge arm against the cabinet frame. You will hear a click when attached.
Drawing 1
Adjust the Door
- Use the adjustment screws on the hinges to align the doors evenly.
Prepare the Drawer Front
- Line Up Drawer Fronts: Drawer fronts are designed have a 1/8” gap between each other and the doors on top, bottom and sides.
- Tip: Begin with bottom drawer front on a drawer bank cabinet. Use a 1/8” spacer to rest drawer front on for easy and consistent spacing.
Attach Drawer Front – Option 1
- Drawer Front Placement: When you are happy with drawer front placement, use double sided tape to hold drawer front placement. Make sure drawer front is level.
- Attach Drawer Fronts: Secure drawer front to drawer box by screwing it on from the inside of the drawer box into the back of the drawer front. Ensure screws go into thickest part of drawer front and do not protrude through drawer front face.
- Check Alignment: Ensure the drawer front is level. If adjustments are needed, loosen the screws slightly and reposition as needed. Re-tighten screws.
Attach Drawer Front – Option 2
- Mark Bracket Placement: Hold the Kolbe Korner bracket (included) against the side of the drawer front and mark the position of the screw holes on both the drawer front and the drawer box. Make sure the brackets are level.
- Drill Holes: Using a drill, carefully drill pilot holes at the marked locations. This will help prevent the wood from splitting.
- Attach the Brackets: Position the Kolbe Korner Brackets back in place, aligning them with the drilled holes. Insert screws through the brackets into the pilot holes, attaching them to the drawer front and drawer box. Tighten the screws but avoid over-tightening.
- Check Alignment: Ensure the drawer front is level. If adjustments are needed, loosen the screws slightly and reposition as needed. Re-tighten screws.
Step 4: Finishing Touches
- Install Hardware: Attach handles or knobs to the doors.
- Cleanup: Wipe down surfaces to remove any dust or debris from assembly.
Step 5: Final Inspection
- Open and close all drawers and doors to ensure smooth operation.
- Inspect for any loose screws or misalignments and make necessary adjustments.